Uploading
Formatting, Lyrics, Credits, Edits - Everything needed to manage your DistroKid content.
Uploading a Release See all 24 articles
-
How to Release Music on DistroKid: Step-by-Step for New Members
Getting your music into stores is quick and simple. Sign up for DistroKid, then head here:
From there, you'll add:
- The streaming services & stores you want your music in
- Your audio
- Your cover art
- Release info (track titles, release date, genre, & more)
Click Continue, and we'll send your music to the streaming services & stores you picked.
That's it.
The long version (only if you want a step-by-step walkthrough)
What to have ready:
- Your audio file (WAV or FLAC sound best)
- Square cover art (3000 x 3000 pixels)
Step 1: Pick your stores
DistroKid delivers to 150+ stores: Spotify, TikTok, YouTube, Apple Music, & more. Pick the ones you want your music on.
Step 2: Add your release info
Upload your audio file and square JPG artwork, then fill in your release details:
- Your artist name
- Song title or titles
- Album title
- Songwriter & collaborator names
Step 3: Pick a release date
- Musician Plus & Ultimate Plans allow you to pick any future date for release day
- If you're on the Musician Plan, your release will go live as soon as it's processed
If you'd like your music to go live everywhere on the same day, we recommend uploading about 4 weeks in advance. DistroKid delivers releases faster than any other distributor, but the extra time gives streaming services a chance to process your release before it goes live.
Step 4: Add your songs
For each track:
- Enter the song title
- Upload your audio file
- Add songwriter info
- Mark explicit lyrics if needed
You can also add featured artists & songwriters, get a cover song license, and set custom pricing and preview start times.
Step 5: Review & submit
Give your release one last look. When it's ready:
- Check the required boxes
- Click Continue
After you upload
How long does it take?
DistroKid delivers your music faster than any other distributor. Most releases appear in stores within a few days.
Typical timing:
- Spotify: 1 to 2 days
- Apple Music: 1 to 7 days
- YouTube Music: 1 to 2 days
Some releases take up to 2 weeks to appear everywhere. Once DistroKid delivers your release, each streaming service processes it on its own timeline.
Releasing a cover song?
Cover songs need licensing, which takes a little longer. Allow up to 14 business days before we can deliver it.
Your HyperFollow page
After you upload, we'll build you a free, customizable HyperFollow page for your release.
Share it on social media to collect Spotify pre-saves before release day and give people one place to find your music once it's live.
Find your pages here:
Go to articleMore stuff to know
What audio formats can I upload?
DistroKid accepts:
- WAV
- FLAC
- MP3
- M4A
- AIFF
- WMA
WAV and FLAC are recommended for the best audio quality.
What are the cover art requirements?
Cover art should be:
- Square
- At least 1000 x 1000 pixels
- RGB color mode
Recommended images are 3,000 x 3,000 square JPG format. This is just a recommendation though—we accept most image sizes.
Do I need an ISRC or UPC?
No. DistroKid generates both automatically and free of charge during upload.
If you're on the Musician Plus or Ultimate plans, you can also add your own ISRC and/or UPC during upload.
Can I choose my own release date?
Yes, with Musician Plus or Ultimate. If you're on the Musician plan, your release will be sent to stores as soon as it's processed, and will go live once each store completes its review and delivery process.
What is HyperFollow?
HyperFollow is a free landing page DistroKid creates for every release. It can collect Spotify pre-saves before release day and automatically updates with streaming links after your music goes live.
-
Entering Track Information on the Upload Form
When you reach the "Track" section of the upload form, you will need to enter specific information for each track of your upload before submitting your release to services.
Information Required for Each Track
Song title
Enter the title of the track in the "Song title" section, without version information or the names of additional artists. Version information and additional artists will be added in later sections of the track menu.
Parenthetical information is okay, as long as it is part of the title and not used to indicate an additional artist or version information. For example, the title of Good Riddance (Time of your Life) by Green Day includes parenthetical information that is not an additional artist or version information for the song.
Add featured artist to song title?
The "Add featured artist to song title?" section can be used if you want to add a featured artist, remixer, or additional primary artist to a track.
For a single, you can only add Remixers or Featured Artists under this section. If your single is a collaboration between two artists, please enter the two artist names as a collaboration in the "Artist/band name" section at the top of the upload form.
For a release with any more than one track, you will also have the option for an "Additional primary artist."
If you need to add more than one additional artist to your track, simply click on the “Add another featured artist” button.
You can select Remixer, Featured artist, or Additional primary artist from the dropdown menu. Once you have selected the additional artist's role, please enter the name of the artist. You can enter pre-existing artist pages for Spotify, Apple, and YouTube Music for all artists added this way in the Artist Mapping section of the upload form.
Add "version" info to song title?
The "Add 'version' info to song title?" section can be used to specify any version information that should be included in parentheses for the track. Common versions include:
- Live
- Acoustic
- Radio Edit
- Remix
- [Remixer] Remix
- [Genre] Remix
Audio file
The "Audio file" section is where you can select the audio file for your track. Check out this article for more information on accepted audio file types.
Dolby Atmos/Spatial audio
In the "Dolby Atmos / Spatial audio" section, you can upload the Dolby Atmos / Spatial Audio mix of your track. If you don't know what this is, check out this article for more information on Dolby Atmos and this article on how to create your own Dolby Atmos mixes.
Songwriter
In the "Songwriter" section, you will indicate whether the song is an original song or a cover song.
Songwriter(s) real name
The "Songwriter(s) real name" section is where you will need to list the songwriter(s) real name for original songs. Check out this article for more information on entering songwriter names.
Cover Song
If you have indicated that your track is a cover song, then you will need to review cover song licensing information, add the original artist and song title, and optionally add the original songwriter's name. You will also need to confirm that the track does not sample or remix another artist's recordings.
Explicit lyrics
If your release has explicit lyrics, you'll need to indicate so in the "Explicit lyrics" section.
Is this a "radio edit"?
If you've marked your track as not having explicit lyrics, then the "Is this a "radio edit"?" section will have you specify whether the track is clean and always has been, or if there is an explicit version of this song that this is the clean or censored version of.
Instrumental?
You can indicate whether your song contains lyrics or is instrumental in the "Instrumental?" section.
Apple Digital Master?
In the "Apple Digital Master?" section, you can indicate whether your release has been mastered by a certified Apple Digital Masters Mastering house. For more info, click here.
Preview clip start time
In the "Preview clip start time" section, you can specify the portion of your track that you would like to be available in store previews. Select "Let me specify when the good part starts" to choose the timestamp for the part of your track you want available for preview in TikTok, Apple Music and iTunes.
Note that preview clip time editing is only available for tracks longer than 1:16.
Track Price
If you have a Musician Plus plan or higher, you can select a track price in iTunes and Amazon by using the "Track Price" section. You can select $0.69, $0.99, or $1.29 – just keep in mind that tracks over 10-minutes long will be priced higher.
Go to article -
Setting a Future Release Date
You can set up a custom future release date for an upload if you are subscribed to the Musician Plus or Ultimate plan. To set a future release date, use the calendar-style date selector under the "Release date" section of the upload form.
When a future date is selected, you can also set a specific release time for your upload to go live in Spotify. For all other services, your release will go live on release day at around midnight in your listeners' time zones.
If you already have a DistroKid account and want to upgrade to access this feature (and more), sign in to DistroKid and click "Upgrade" from the top navigation bar.
Click here for more information on custom release dates.
How to Set a Future Release Date
Here's how you can set a future release date on the upload form:
- Head to the upload form at https://distrokid.com/new
- Scroll down to the "Release Date" section
- Click on the dropdown menu containing the date
- Select your intended release date using the calendar-style date selector
Setting a Release Time in Spotify
When setting a future release date, you can also set a specific time for your release to go live in Spotify on its release date. To set a release time, use the time selector under the "Release Time" section on the upload form. This only becomes available after selecting a future release date for your upload.
After you've selected a future release date, you can decide if it will go live on Spotify at the chosen time in the listener's local time zone or simultaneously across all regions. This option is found in the "Time synchronization" section of the upload form. If you select the simultaneous option, the release will launch at your chosen time in New York (EST) for all regions.
Go to article -
Setting Up Pre-Orders For Your Music
With DistroKid, you can set up a pre-order period for your releases in iTunes, Amazon, Qobuz, and Beatport (if you have the Beatport Album Extra). Setting a pre-order period will allow your fans to pre-purchase your release before its release date. Note that pre-ordering is not available in other stores and streaming services at this time.
To set up a pre-order period for your release, you'll need to set a release date to at least 5 days in the future (Musician Plus or Ultimate plan required) on the DistroKid upload form. After you have chosen a future release date, you'll see the "Preorder?" section. Click "Yes," and then enter the pre-order start date.
That's it! Continue uploading as usual, and your pre-order date information will be sent to iTunes, Amazon, Qobuz, and Beatport (if applicable).
Go to article -
What Are Album Extras?
Album Extras are optional add-ons you can opt into on any one of your uploads. While not mandatory for store distribution (except for cover licenses), they can enhance your music's accessibility for fans.
Album Extras can be opted into on the upload form during the upload process, or from your "My Music" page after the upload process.
Some Album Extras are one time payments, while others are subscription based, just like our membership subscriptions.
Available Album Extras
Discovery Pack: $0.99 per song, per year
Discovery pack adds your release to the global databases that people use to match music and artist information. This includes recognition in millions of automobiles via Gracenote, and registration with SoundScan, which is used for Billboard charts. The Discovery Pack adds your release to discovery-based platforms such as ACRCloud, Jaxsta, Gracenote, and Luminate.Store Maximizer: $7.95 per album, per year
The Store Maximizer will automatically deliver your release to new online stores and streaming services as we add them to our distribution network. We'll always give you notice before the Store Maximizer adds your music to a new service.Social Media Pack: $4.95 per single, per year OR $14.95 per album, per year, + 20% of ad revenue
With the Social Media Pack, you will be notified and paid if your music is used in any YouTube or TikTok videos. We'll add your tracks to both the YouTube and TikTok databases, and continually scan for matches. When your music is detected in any YouTube video, you'll be notified—and ad revenue will automatically go to you, instead of to the person who uploaded the video.Beatport: $9.99 per month
A subscription for the Beatport Album Extra allows for unlimited delivery of your releases to Beatport, which is a popular online store exclusively for electronic music. Note that your music must have an Electronic genre and subgenre to be delivered to Beatport.
Audiomack: free! (Audiomack Account Required)
Connect your DistroKid account to your Audiomack account here to enable the free delivery of your music to their service.
Cover Song Licensing: $12 per cover song, per year
A cover song license is required for every cover song that is uploaded to DistroKid. A cover license costs $12 per cover song, per year. For more information about DistroKid cover licenses, please see the FAQ article here: https://support.distrokid.com/hc/en-us/articles/360013648953
Leave a Legacy: $29.00 per single, $49.00 per album of 2+ tracks (nonrecurring fee)
Opt into the Leave a Legacy extra to prevent the removal of your release due to lapsed membership payments, like rejected credit cards.
Additionally, releases with the Leave a Legacy extra will remain available in stores and streaming services even after account cancellation.
Adding Leave a Legacy to a release does not replace your annual membership fee if you have an active subscription. It is also not a one-time payment for all releases; each release requires this extra if you want to cancel your subscription and retain all of your releases in stores and streaming services.
Dolby Atmos: $26.99 per track (nonrecurring fee)
When opted into for a track, the Dolby Atmos extra designates the track as available for spatial audio listening on supported devices and streaming services including Apple Music, Tidal, and Amazon.
Please note that tracks must be properly mixed for Dolby Atmos when opting in to this extra. We'll check your audio files, and if they aren't valid for Dolby Atmos, you won't be charged.
Loudness Normalization: $2.99 per track one time fee (nonrecurring)
When you select the Loudness Normalization extra, DistroKid will automatically adjust the level and headroom of your audio to Spotify's recommended settings: -14dB integrated LUFS with -1dB true peak maximum. Your newly adjusted audio will be sent to all streaming services you've selected.
Go to article -
Can I Add or Remove a Track from an Album That's Already Uploaded?
Once you upload an album to DistroKid, it is not possible to add any tracks to it or remove any tracks from it. If it's crucial that you need to add a track to a release or remove one from it, you will need to delete the release from your DistroKid account, and then re-upload it with the intended tracks.
Go to article
Formatting Details See all 25 articles
-
What Audio File Formats Can I Upload?
Audio files you upload to DistroKid should be WAV, MP3, M4A, FLAC, AIFF, or Windows Media (WMA). For each of these file types, please make sure your file name ends with the appropriate extension (.WAV, .MP3, etc.). Your audio file name must not contain any of these invalid characters: \ / : * ? " ' < > |
If you're sending a WAV, 16-bit, 44.1 kHz WAV is typical, but pretty much any specification works.
The maximum size that DistroKid will accept is 1 GB. If you have a track that's larger than that, consider converting it to FLAC format before uploading to DistroKid. FLAC is a beautiful, lossless format (same audio quality as WAV), but the files are relatively small.
Tracks uploaded to DistroKid must have a duration under 5 hours (300 minutes), and the sum of tracks on an album cannot exceed 10 hours (600 minutes). Additionally, albums cannot contain songs where the average track length is less than 60 seconds.
Go to article -
What Are the Requirements for Album Artwork?
Album artwork should be in the .jpg file format. The minimum size requirement for album art is 1000x1000 pixels. Ideally, album art should be perfectly square, and 3000x3000 pixels. If your artwork is smaller or rectangular, we'll automatically adjust it for you, but there's a risk that our fixed version won't look exactly as you intended.
Artwork must be one image file, and cannot include multiple "pages" of art, regardless of whether the release is a single, EP, or album.
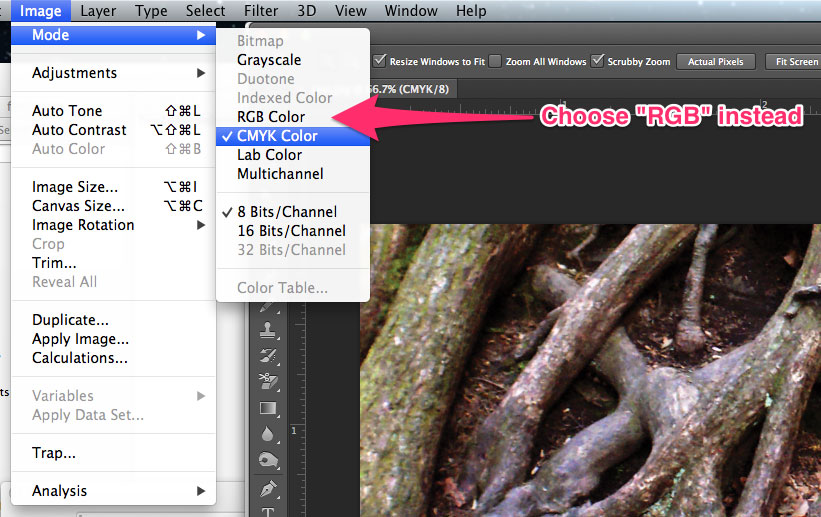
Please also make sure your artwork is in the RGB color space. You typically don't have to think about this – every digital camera and photo retouching program (like Photoshop) defaults to RGB.
Things to Avoid Putting in Album Artwork
Streaming services will reject artwork that contains any of the following:
- A website address (URL)
- QR Codes
- Name of a page on the X platform
- Any image that's blurry, pixelated, rotated, or poor quality
- Unlicensed/stock photography
- Prices
- Streaming service logos (such as iTunes or Spotify)
- Social media logos (such as X, Instagram, TikTok)
- Nudity
- Gross stuff
- References to physical media (example: "CD" or "Compact Disc")
Also, please do not use the same artwork for multiple releases. Duplicate album art may be rejected.
Updating the Color space to RGB
If you have saved your artwork in the CMYK or Grayscale color space and DistroKid gives you an error, you can re-save your artwork in RGB format and try again.
If you use Photoshop, click here to see how. If you don't have Photoshop, uploading and re-saving your file with the Pixlr editor will automatically convert it to RGB.
Go to article -
Uploading a Song/Album/Artist name in All Capital or Lowercase Letters
It's possible to enter the capitalization/stylization that you want for your artist name and all album and release titles.
Please note that some streaming services don't love non-standard capitalization and may default to standard capitalization on their end, per their style guides. If services do not allow non-standard capitalization, we may not be able to request an edit to change the capitalization for you on their end.
Go to article -
Understanding Artist Roles
Artist roles are identifiers you can use to indicate to services what role a given artist played in the creation or performance of a given release. These roles can be indicated on the track level or the album level. Services accept the following artist roles from DistroKid:
Album Artist
An Album Artist or "performer" is the major artist at the album level. For example, on Kendrick Lamar's album DAMN., "Kendrick Lamar" is the Album Artist for this album.
If you have a few songs on your release with multiple artists, but most are by one artist, please list only the artist that will appear on every track in the "Artist/band name" Field. This will indicate your Album Artist for the release. For individual tracks with more than one artist, you will list the additional artists (Featured, Remixer, Additional Primary Artist) at the track level.
Primary Artist
A primary artist is the main artist for at the track level. The track can include the Album Artist and other additional collaborators credited as primary artists. For instance, on Moore Kismet's album Vendetta for Cupid, Moore Kismet is the Album Artist. On the track Rumor, both WYN and Moore Kismet are Primary Artists, making that track a collaboration.
Featured artist
A featured artist is any artist assisting in the performance of a track but not at the fundamental level of a primary artist. Featured artists usually feature for a verse or as a vocalist on a track. For example, for SOS (feat. Aloe Blacc) by Avicii, "Aloe Blacc", who sings on the track, is the featuring artist for this track, where as "Avicii" is the Primary and Album Artist.
Remixer
A remixer is an artist who remixes original works. For instance, in Love That Never (IMANU Remix) by TOKiMONSTA, "IMANU" is the remixer, while "TOKiMONSTA" remains the primary artist of the original song.
Producer
The role of a producer has diversified recently, but on Spotify, producer credits are listed under track details. For instance, in the song Buddy Holly by Weezer, "Ric Ocasek" is credited as the producer. To view producer credits on Spotify, right-click a song in the desktop app and choose "Show Credits."
Go to article -
Uploading a Collaboration Between Multiple Artists
It is possible to upload collaborations at both the album level and the track level with DistroKid.
Album level collaborations are releases in which all tracks are credited to the same collaborating artists. Track level collaborations are individual tracks within a greater release that are credited to multiple artists.
For album-level collaborations, make sure to enter the collaboration name within the "Artist/band name" section of the upload form. For track-level collaborations, use the "Add featured artist to song title?" section within the track information on the upload form or after upload by adding additional primary artists.
Uploading an Album-Level Collaboration
If you have an album or single with multiple main artists, you can list them in the "Artist/band name" section of the upload form using an ampersand (&), an "X," or the word "and" to indicate a collaboration. You can also use commas for collaborations of three people.
For example, for a collaboration between Moore Kismet, Pauline Herr, and Rezz, you could input any of the following to indicate them all as main artists for the whole album:
Moore Kismet, Pauline Herr & Rezz
Moore Kismet x Pauline Herr x Rezz
Moore Kismet, Pauline Herr, and Rezz
If you are uploading a single, you must add your collaborators at the album level, and not at the track level. Additionally, note that collaborations at the album level take up an artist slot, even if one of the artists is already being used on your account. If you need more artist slots, you can upgrade your account.
Uploading a Track-Level Collaboration
If your release has more than one track, then it is possible for one or more of the tracks to have additional primary artists. Please note that track-level collaborations are not possible for singles – a single that is a collaboration must be set at the "album" level. Additionally, if every track on a release is a collaboration between the same primary artists, then the collaboration must also be credited at the album level.
Adding an Additional Primary Artist During Upload
If you have individual songs on your release that have multiple primary artists, you can list those collaborators in the individual song by utilizing the "Add featured artist to song title?" section within the track information on the upload form. This should be done after entering the main artist name of the entire album in the "Artist/band name" section of the upload form.
You will see a section under "Song Title" for the track that says "Add featured artist to song title?". To add a collaborator to the track, select "Yes, add featured artists to track title (please specify...)," and it will provide a dropdown menu where you can select the artist role: Featured Artist, Additional Primary Artist, or Remixer. For more information on artist roles, check out this article.
Once you select the role, you can enter the artist name for your collaborator in the input field on the right. You can also add additional collaborators by clicking "+ Add another featured artist."
Adding an Additional Primary Artist After Upload
To add or edit a primary artist on a track that has already been uploaded, head to the album page from your DistroKid dashboard and click "Edit release."
First, select "Yes, add featured artists to track title (please specify...)." Then, click "Add another featured artist" and choose "Additional primary artist" from the dropdown. Finally, enter the artist’s name for the additional primary artist.
Once the additional primary artist is entered, click on "Submit edit request" on the bottom of the edits page. Streaming services usually handle these edits within a few days, but metadata updates like this can take 1-2 weeks to reflect across all services.
Go to article -
Adding a Featured Artist to a Track
It's possible to add a featured artist to a track during the upload process under the "Track" section of the upload form, or after upload via an edit request submitted from the album page.
Adding a featured artist does not require any additional artist slots on your DistroKid account.
Please note that if you have the same featured artist on all tracks of a multi-track album, streaming services require that they instead be listed as a Primary artist.
Adding a Featured Artist During Upload
To add a featured artist to a track on the upload form, select "Yes, add featured artists to track title (please specify...)" under the "Add featured artist to song title?" section.
After selecting "Yes," enter the artist name for your featured artist.
You'll have the opportunity to enter your featured artist's existing Spotify, Apple Music, and YouTube Music pages in the "Artist Mapping" section found at the bottom of the upload form.
Adding a Featured Artist After Upload
To add or edit a featured artist to a track that has already been uploaded, head to the album page from your DistroKid dashboard and click "Edit release."
Select "Add another featured artist" and choose Featuring from the dropdown, then enter in your featured artist info. After selecting "Yes," enter the artist name for your featured artist.
Once the featured artist is entered, click on "Submit edit request" at the bottom of the edits page. Streaming services usually handle these edits within a few days, but metadata updates like this can take 1-2 weeks to reflect across all services.
Go to article
Making Edits See all 19 articles
-
Editing a Release After It's Uploaded
You can edit your release after it's live. Go to your album page in DistroKid, click "Edit Release," make your changes, and hit "Submit Edit Request" at the bottom.
Most services process edits within a few days, but it can take up to 1-2 weeks for changes to show up everywhere.
Important: Stores don't let you upload a release, delete it, and re-upload it with different metadata (like a new artist name or title). It's always better to submit an edit while your release is still live.
What You Can Edit
The exact edits available depend on your release and plan level, but here's what's possible:
- Swap an audio file (Ultimate plan only, at https://distrokid.com/audioswap. More info here.)
- Artist/band name (more info)
- Collaborators (add or remove, at the album or track level)
- Album title
- Record label
- Release date
- Pre-order status and start date
- Album artwork
- Song titles
- Song version info
- Explicit lyrics tagging
- Preview clip start time
- Delete the release from stores
Need to change your artist name entirely? Check out this article.
Need to remove your release from a specific store, remove it from certain countries, or change the genre? Contact our support team and we'll help.
What You Can't Edit
These can't be changed through the edit page:
- Track order/listing
- Release language
- Album Extras (can't be removed)
- Genres
- ISRCs
To change any of those, you'll need to delete your release and re-upload a corrected version. More on that here.
How Long Does It Take?
Most services handle edit requests within a few days. For changes to show up everywhere, expect 1-2 weeks.
The whole process from start to finish usually takes 1-3 weeks. Artist name rebrands are the exception. Those can take up to several months.
Once a request is submitted, we can't speed it up or cancel it. You also can't submit another edit until the current one is approved.
Go to article -
My Artist Name or Album/Track Title Isn't Capitalized Correctly, What Can I Do?
When you upload to DistroKid, you can enter your artist name and album/track titles exactly the way you'd like them stylistically capitalized in services. For example, you may like the name DistroKid as is, or you may like it stylized better as distrokid. It's your choice!
If your artist name or album/track titles aren't capitalized correctly in services, we can help get it right for you. First, log in to your DistroKid account and head to your dashboard to check the releases for the artist name in question. If the name or titles are not capitalized correctly in your account, you'll need to submit an edit request to get the capitalization fixed right in DistroKid. After submitting the edit request, streaming services usually process it within a few days, but it can sometimes take 1-2 weeks to appear across all platforms. Check this article for more information on submitting an edit request.
If your artist name or album/track title is not capitalized correctly in services but it appears correct in your DistroKid account, please reach out to our support team. They'll help make sure the artist name gets corrected in services!
Go to article -
How to Change Your Artwork After Upload
If you have uploaded a release and would like to change the artwork for it, you can submit an edit request to do so. To submit an edit request, go to the album page via your DistroKid dashboard, and then click "Edit Release" in the upper-right.
Once at the edit request page, scroll down to the "Album cover" section and drag your image into the box or click on the box to search for the file through your device storage. Once the image is selected, scroll down to the bottom of the page and click "Submit Edit Request" to submit the request.
Streaming services typically process edit requests within a few days, but please be aware that artwork changes may take up to 1-2 weeks for changes to take place in all services.
Please keep in mind that the same requirements for artwork that apply for new uploads also apply to edit requests. For more information on these requirements, see this article: https://support.distrokid.com/hc/en-us/articles/360013534334.
Go to article -
I Uploaded the Wrong Song, What Can I Do?
If you've uploaded the wrong file for a song, you can use our Audio Swap feature to replace that file and make sure the correct one is used for your song.
Please note that Audio Swap should only be used for minor adjustments to a file, like if you uploaded the wrong mix/master. If you uploaded the completely wrong song during the upload process and need to replace it with a fundamentally different song, then you will need to delete the current upload and re-upload it with the desired track.
For more information on the Audio Swap feature, check out this article: https://support.distrokid.com/hc/en-us/articles/39612177702163.
Go to article -
Can I Change the Song or Track Titles of My Release?
You can submit a request to change the song or track titles for a release after you've uploaded it by submitting an edit request for the release.
To submit an edit request, visit your album page from your DistroKid dashboard and click "Edit Release." This brings you to the edits page for that release.
You can submit many types of edits for your release through the edits page in addition to changing song titles. Once you've made the update to your release via this page, click "Submit Edit Request" at the bottom of the page.
Please note that it is not possible to submit an edit request if there is already a pending edit request for the release, if the release is processing, or if it has been rejected. Streaming services typically process edit requests within a few days, but please be aware that metadata updates from edits may take up to 1-2 weeks for changes to take place in all services.
Go to article -
I Want to Submit an Edit or Delete My Release, But It Says "There is Already an Edit Request Pending Review"
If you've requested an edit for your release, keep in mind that it can take up to a week or so for us to review and submit your edit request to services. This is to make sure your edit complies with various rules set by the streaming services.
Once your request is approved and submitted to services, you'll be notified by email. It can take an additional week for services to process the request once submitted. Overall, the entire editing process can take up to 2-3 weeks.
While an edit request is pending review, you cannot submit more requests or delete your release – you may do so once the initial request is processed. You can also cancel the pending edit request by visiting the album page, clicking "Edit Release," and then "cancel the current edit request."
Go to article
Troubleshooting See all 11 articles
-
How to Check the Status of Your Uploads from Your DistroKid Dashboard
Your DistroKid dashboard has nifty indicators to let you know the status of any of your uploads. From your DistroKid dashboard at https://distrokid.com/mymusic, you'll see a circle to the left of the artwork for each upload you've made. This circle will be one of three colors based on its current status:
- Green: Your release was successfully processed and delivered to services.
- Yellow: Your release is currently processing or is currently being delivered to services.
- Red: There is an error with your release that is preventing it from being delivered to services.
For more detailed information on the status of a specific upload, you can click on the specific release from your DistroKid dashboard to view the release's album page.
If you're concerned about the delivery of your release and it is currently in the yellow "processing" status, check out this article for more information: https://support.distrokid.com/hc/en-us/articles/360046009174.
If your release is in the red "error" status, you will have received an email notification with information on the specific issue preventing your release from being delivered to services. You can review this email or view the album page for the errored release for more information. If you require further assistance with an errored release, please contact our support team.
Go to article -
My Release is Stuck Processing
If your release appears to be stuck processing with the yellow circle next to your album/track/artwork, this typically means additional processing time is required.
It can take several days for releases to be reviewed, approved, and sent to streaming services. If it's important that your release goes live on a specific date, click here to read about release dates.
Delays are rare, but they do happen, and are typically outside of DistroKid's direct control.
Cover License Processing
Securing cover song licenses can take up to 14 business days. Releases with cover songs will be submitted as soon as the license is approved by Harry Fox Agency (who handles our cover licenses). If you plan on releasing a cover song on a specific date, please keep this in mind and plan accordingly.Go to article -
Handling the "File Size Too Small" Error for Uploads
If you received a notification saying the file you uploaded to DistroKid is too small and is causing an error with the upload, the issue is likely related to an internet connection timeout or instability issue at the time of upload.
If this occurs, we recommend taking the following steps:
- Delete the current upload with the errored track.
- Check your internet connection for issues and make sure it is as stable as possible (we recommend a wired internet connection, if possible).
- Re-upload the release with a stable internet connection.
It's also worth checking to make sure your audio file isn't actually too small of a file – keep in mind that audio files uploaded to DistroKid should be WAV, MP3, M4A, FLAC, AIFF, or Windows Media (WMA). 16-bit, 44.1 kHz WAV is typical of most uploads.
Go to article -
Handling a Rejected DistroKid Release
Every service DistroKid delivers to has specific guidelines for how releases are formatted, and what kind of content they'll accept.
If you were notified that your upload to DistroKid was rejected, you'll likely need to delete and re-upload your release in order to fix what was flagged during the review process. Details on the rejection will be included in the email you received. If you think your release was rejected in error, just reply to that email for more information.
Note that deletion and re-upload is not necessary if services require verification for your upload, or if your artwork was rejected. If this is the case for your upload, you can take action to get your release delivered without having to delete and re-upload it.
Release Rejected for Verification
If you receive a verification request for your upload, please do not delete it. For more information on how to verify an artist name on DistroKid, click here.
Release Rejected for an Artwork Issue
If your release was rejected for an artwork issue, you can also replace the artwork on an existing release to make corrections. On your album page, click "Replace Artwork" on the right side of the Artwork section to update your album artwork.
For more information regarding album artwork requirements, click here.
Go to article -
Verifying an Artist Name When DistroKid Requires It
Sometimes, stores require an artist to verify their artist name. This helps protect your content on DistroKid and within stores, and ensures that no one is uploading your music or using your artist name without your permission.
Please note that artist name verification is only required when DistroKid asks it of you – it is not necessary to contact DistroKid to verify an artist name before then.
To verify an artist name and provide permission to use it, the artist needs to contact us directly and verify the artist name via one of these options:
- If the artist uses Instagram, they can send a Direct Message ("DM") to @distrokid to verify. In the DM, please include the UPC of the release. Something like "Verifying for UPC [UPC code]" will work great as a verification DM. Note that a brand-new Instagram account won't work for verification purposes.
- If the artist uses X, they may send a Direct Message ("DM") to @distrokid for verification. In the DM, please include the UPC of the release. A message like "Verifying for UPC [UPC code]" will work well for verification purposes. Please note that a newly created X account will not be accepted for verification.
- The artist can send a photo of the artist's driver's license or passport (you may block out personal info such as address) along with the UPC of the release that requires verification.
If the artist name is different than the legal name on the ID, they will also need to provide a link to a website where we can associate the legal name on the ID to the artist name – artists have used links to these websites to verify: Facebook, Instagram, YouTube, Bandcamp, SoundCloud, Twitter/X, Wikipedia.
-
Handling the "File Has Zero Bytes" Error
If you see an error message for your upload that says "The file you uploaded is zero bytes," it means that your uploaded audio file can't be played. Sometimes this happens if you try uploading to DistroKid from a mobile device or cloud storage, as file storage is handled differently than a computer that has the file saved locally. If you see this error, you'll need to abort the previous attempt and re-upload your release.
Uploading Files From an iOS Device Correctly
If you are uploading your music from an iOS device, you will need to make sure you select your files from the iOS file browser. If you do not, you may have issues uploading your album cover or audio files, leading to the error message stating "The file you uploaded is zero bytes."
Starting from the DistroKid dashboard, select "Upload", and then select "Upload Music" to get to the upload form.
Uploading Your Album Artwork From an iOS Device
When you get to the "Album cover" section of the upload form, tap on the box where it says "Select an image." You will be given the option to select a photo from your photo library, take a photo, or browse your iOS device's file browser. You will need to select your artwork file from your device's file browser – tap on "Choose File."
Once you have selected "Choose File," you will be presented with your device's native file browser. You can now navigate to where you have stored your files for the upload.
Uploading Your Audio File From an iOS Device
When you get to the "Audio file" section of the upload form, tap on "Choose File." You will be given the option to select a photo from your photo library, take a photo, or browse your iOS device's file browser. You will need to select your audio file from your device's file browser – tap on "Choose File."
Once you have selected your audio file this way, you should be good to go! If you are experiencing issues, make sure you are storing your files locally on your iOS device instead of in iCloud. The DistroKid upload form does not support cloud uploading at this time, so you will need to upload files directly from your iOS device.
Go to article
ISRC // UPC See all 9 articles
-
Getting ISRCs From DistroKid
To locate the ISRC for a given track, click on the title of that release on your DistroKid dashboard to get to the album page. Scroll down just a bit and you'll find the ISRC listed across from the associated track.
DistroKid assigns a unique ISRC to each song you upload.
DistroKid has been appointed by the US ISRC Agency to assign ISRCs, and will automatically generate new DistroKid ISRC codes for every song you upload. It's free and automatic.
Getting ISRCs Before Upload
It's not possible to get an ISRC from DistroKid before uploading a release. However, if you need your DistroKid ISRCs before your music goes live, you can follow these steps (only possible with the Musician Plus or Ultimate plan):
- Upload your music. Set the release date for sometime in the future (we recommend at least 4 weeks for most releases).
- ISRCs are assigned just before submitting a release to streaming services. After assignment and delivery, you can find the ISRCs next to the track titles in the album page you can access from your DistroKid dashboard. Remember to note or save them.
- After obtaining the ISRC(s), you can delete your release if you prefer it not to go live. As long as you delete it before the initial release date, it will still qualify for future playlist pitching if you choose to re-upload it.
- If you delete your release and wish to re-upload it later, click "already got an ISRC code?" next to the track on the upload form to enter your saved ISRCs from step 2.
-
What is a UPC?
UPC stands for "Universal Product Code." It is a unique code used to identify a product, such as an album or single.
A DistroKid UPC is automatically generated for you each time you upload a release, and are only intended for digital distribution within DistroKid. We cannot vouch for them working for anything outside of DistroKid.
If you want to apply for a UPC issued by GS1 to use for your music outside of DistroKid, please contact your local GS1 office here.
Go to article -
What is an ISRC?
An ISRC (International Standard Recording Code) is a unique identifying code for individual sound recordings. Think of it as your track's fingerprint – it helps identify it amongst all the songs available in the world, even if those songs have the same title.
DistroKid has been appointed by the US ISRC Agency to assign ISRCs. If your recording has not already been assigned an ISRC (either by you or a party acting on your behalf), DistroKid will generate an ISRC for every song you upload. It's free and automatic, and doesn't affect your earnings.
If you already have ISRCs for your recordings or wish to assign your own ISRCs, the Musician Plus or Ultimate subscription plan is right for you. On these plans, you can use your own ISRCs when uploading your music. For information on purchasing your own ISRCs, please visit www.usisrc.org.
Go to article -
How Do I Find the UPC for My Release?
Here's how you can find a DistroKid UPC:
- Sign into DistroKid.
- Click on the release you're interested in finding the UPC for.
- See the UPC displayed under your artwork, next to "DK UPC."
You can find more information on UPCs here: https://support.distrokid.com/hc/en-us/articles/39509529924243.
Go to article -
Using Existing ISRCs or UPCs for New DistroKid Uploads
It's possible to bring existing ISRCs from outside of DistroKid and use them for a DistroKid upload. It is not possible to use UPCs from outside of DistroKid and use them for new uploads, however.
ISRCs
DistroKid has been appointed by the US ISRC Agency to assign ISRCs for tracks. If your recording has not already been assigned an ISRC (either by you or a party acting on your behalf), DistroKid will generate an ISRC for every song you upload. It's free and automatic.
If you instead need to specify your own ISRC, you can do so on the upload form in the Musician Plus or Ultimate plan. You can click "already got an ISRC code?" on the upload form under the "Upload your audio file" section.
If you'd like to purchase your own ISRCs, visit https://www.usisrc.org/
UPCs
There is no way to specify a custom UPC for DistroKid uploads. A unique DistroKid UPC is generated for every upload to DistroKid.
If you want to apply for a UPC issued by GS1 to use for physical distribution outside of DistroKid, please contact your local GS1 office here.
Go to article -
Can I Change the ISRC for a Track After It's Uploaded?
Once a track is uploaded, the ISRC is locked in – it's not possible to change an ISRC after that point.
If you have your own ISRC and need to use it for a track you've uploaded, you will need to delete the release with the track, and then re-upload it while making sure to enter your intended ISRC on the upload form.
For more information on entering your own ISRC on the upload form, check out this article: https://support.distrokid.com/hc/en-us/articles/360013648993.
Go to article
Lyrics See all 7 articles
-
Correcting Rejected Lyrics
If your submitted lyrics were rejected, they likely did not pass specific requirements determined by the services DistroKid delivers to. Here's a list of those requirements:
- Do not include the vocalist's name.
- Do not include extra text (ex: "intro," "chorus," social media links).
- Write out all repeated lines. Do not write "Chorus 2x," etc.
- Begin each line with a capital letter.
- Do not use punctuation at the end of a line, except for exclamation or question marks.
- Only include line breaks (empty spaces between lines) between sections, like verses or choruses.
- Do not add extra spaces at the beginning or end of lines.
- Avoid entering excessively long lines – one sentence per line.
- Do not censor explicit words unless the words are dropped/bleeped in the audio recording.
Example: Don't enter "F***", unless the word was dropped or bleeped - Do not enter numerical characters for numbers between 1-10.
Example: The number 2 must be written as two. - Use standardized spelling (ex: Tryna should be written out as Trying to).
For a complete list of lyric requirements, visit Apple Music's lyric guidelines.
Common Lyric Rejection Reasons
No Line Breaks Between Sections (verse/chorus/bridge/etc.)
Line breaks (empty space between lines) should only be places between sections of your lyrics, like between a verse and chorus.
Do not format your lyrics like this:
So I pointed my fingers
And shouted few quotes I knew
As if something that's written
Should be taken as true
But every path I had taken
And conclusion I drew
Would put truth back under the knife
And now the only piece of advice that continues to help
Is anyone that's making anything new only break something else
When my time comes
Oh oh oh oh
When my time comes
Oh oh oh ohDo format your lyrics like this:
So I pointed my fingers
And shouted few quotes I knew
As if something that's written
Should be taken as true
But every path I had taken
And conclusion I drew
Would put truth back under the knifeAnd now the only piece of advice that continues to help
Is anyone that's making anything new only break something elseWhen my time comes
Oh oh oh oh
When my time comes
Oh oh oh oh
Too many line breaks (unnecessary spaces between each line)
Please also avoid adding unnecessary lines breaks in your lyrics – line breaks should only be added between sections of the lyrics (like between a verse and chorus). Line breaks should also be not more than one space between lines.
Do not format your lyrics like this:
There's traffic on the bridge
But the skyline shines with a certain light
I know you're sick of itDo format your lyrics like this:
There's traffic on the bridge
But the skyline shines with a certain light
I know you're sick of it
Too many grammar/spelling/capitalization errors
Try to avoid excessive grammar, spelling, and capitalization errors in your lyrics.
Do not format your lyrics like this:
2day is gona b the day
That their gonna throw it back to u
By now u shouldve some how
Realized what u gotta do
I dont believe that n e body
Feels the way I do about u nowDo format your lyrics like this:
Today is gonna be the day
That they're gonna throw it back to you
By now you should've somehow
Realized what you gotta do
I don't believe that anybody
Feels the way I do about you now
Punctuation at the end of lines
Punctuation at the end of lines is not permitted, except for exclamation and question marks where appropriate.
Do not format your lyrics like this:
Everything is everything.
What is meant to be, will be.
After winter, must come spring.
Change, it comes eventually.Do format your lyrics like this:
Go to article
Everything is everything
What is meant to be, will be
After winter, must come spring
Change, it comes eventually -
What is Lyric Blaster?
Lyric Blaster, powered by Musixmatch, is a subscription that you can purchase for an artist on your DistroKid account that sends your synced lyrics to platforms such as Spotify, Instagram, Facebook, and Tidal.
Lyric Blaster is an annual subscription, per artist. Opting an artist into a Lyric Blaster subscription will allow synced lyrics for all existing and future releases to be sent to Spotify, Instagram, Facebook, or Tidal.
Go to article -
Adding Lyrics to Your Music
To add lyrics to your songs in DistroKid, you can visit your lyrics dashboard by clicking the DistroKid Features menu in the upper right of DistroKid, selecting "Enhance your music," and then clicking "Lyrics." You can also head directly to https://distrokid.com/lyrics.
Here, you'll be able to submit and manage both plain and synced lyrics for your songs. Note that synced lyrics require opting into Lyric Blaster for the associated artist. To learn more about synced lyrics and Lyric Blaster, check out this article: https://support.distrokid.com/hc/en-us/articles/360039436134.
Once you submit lyrics, it takes around 1-2 weeks for them to go live in streaming services.
Learn more about where your lyrics are distributed in this article: https://support.distrokid.com/hc/en-us/articles/360039436194.
Adding Plain Lyrics
To add plain lyrics to a song, click on "Plain Lyrics" for the song at https://distrokid.com/lyrics. Once there, you can type or copy/paste your lyrics into the page. After they're added, you can review them for accuracy, then choose to opt into Lyric Blaster for the artist if you have not done so already.
After you make your decision on Lyric Blaster, you can read the DistroKid Lyric Agreement and check the agreement box before clicking "Save lyrics" to submit your lyrics.
Note that all submitted lyrics must pass requirements to be delivered to services. To review those requirements, check out this article: https://support.distrokid.com/hc/en-us/articles/360050506673
Adding Synced Lyrics
To add synced lyrics to a song, opt in to Lyric Blaster for the artist via the plain lyrics page for the song. Once opted in, click on "Synced Lyrics" for the song at https://distrokid.com/lyrics. This will bring you to an interactive page to create your synced lyrics for the song. Please note that approved plain lyrics are required before submitting synced lyrics.
For more information on submitting synced lyrics, check out this article: https://support.distrokid.com/hc/en-us/articles/360039436134.
Go to article -
I Submitted My Lyrics But They're Not in Services
We send your lyrics to services and platforms as soon as you upload them. Please note, however that it may take a couple of weeks for lyrics to show up in services once submitted via DistroKid.
If your lyrics are approved by DistroKid but not visible after two weeks, it may be due to formatting issues. Check your lyrics for proper formatting and resubmit them through DistroKid if necessary.
Also, keep in mind that a Lyric Blaster subscription is required for synced lyrics to be delivered to platforms such as Spotify, Instagram, Facebook, and Tidal. If your synced lyrics are not in these services for an artist, you can create a subscription to Lyric Blaster via the lyrics page for the release.
Lyrics Formatting Tips
Here are some formatting issues to look for if your lyrics are not visible in services after at least two weeks:
- Excessively long lines in your lyrics: Try to keep lines short or break them up. Lyrics no longer than 5-6 words each will likely fit services' formatting guidelines.
- Line breaks between lyrics: If your song doesn't have distinct verse/chorus/bridge parts, you should enter line breaks to split up sections and stanzas. Most services will not accept more than 10 lines without a break.
- Spaces: Extra spaces or a lack of spaces can cause your lyrics to be rejected by services.
- Punctuation: Lyrics can be rejected if you have punctuation at the ends of lines. Removing all punctuation usually helps, including parentheses.
- Unnecessary capitalization: Only capitalize the first word of each line and proper nouns.
- Non-standardized spelling in your lyrics: For example, instead of runnin', try running. Avoid including non-words in lyrics.
- Spell out numbers: For example, instead of "100," type "one hundred" instead.
-
Where Will My Lyrics Show Up?
Plain Lyrics
Delivery of plain (not synced) lyrics to services is free for all DistroKid plans. DistroKid sends your plain lyrics to these services:
- Apple Music
- YouTube Music
- LyricFind
- Google Search Results
- and more
Please note that it is not possible to deliver lyrics for cover songs.
Synced Lyrics
Opt into Lyric Blaster to submit synced lyrics to these services:
- Spotify
- Tidal
Log in and submit plain lyrics for your release to opt in. You can add Lyric Blaster from the lyrics page.
Go to article -
How Do I Get Synced lyrics for My Songs?
Synced lyric deliveries to Apple Music and YouTube are available to all artists on Musician Plus and Ultimate subscriptions. We also offer our Lyric Blaster service, powered by Musixmatch, if you want synced lyrics in Spotify, Tidal, Instagram and Facebook.
To get synced lyrics on Spotify and Instagram, the first step is to upload plain text lyrics. Then, when submitting, opt into Lyric Blaster. Once your plain lyrics are approved, you can submit synced lyrics from the lyrics dashboard at https://distrokid.com/lyrics by clicking "Synced Lyrics."
For more information about where lyrics will be delivered, click here.
Creating Synced Lyrics
To create synced lyrics for a song, you can head to the release page for the release from your DistroKid dashboard, scroll to the "Songs" section, and then click on "Synced Lyrics" by the song you want to add synced lyrics to. Alternatively, you can head to the lyrics dashboard at https://distrokid.com/lyrics and click on "Synced Lyrics" next to the song.
Here's how to create synced lyrics once you're on the synced lyrics page for a song:
- Press the play button to start the audio for the song.
- When a lyric starts, hold the space bar for the duration of that lyric.
- When a lyric ends, release the space bar.
- Repeat for all lyrics until the last lyric ends.
If you mess up the timing for a lyric, click where it says "Click here to reset" to reset all synced lyrics and try again.
Please note that synced lyrics can only be submitted for tracks with approved plain lyrics. If you've just uploaded plain lyrics, please wait for our review of those lyrics, which typically takes about a day.
If you are having trouble with playback while trying to sync your lyrics, try again using Google Chrome if you aren't already.
Go to article
Credits See all 6 articles
-
Why Aren't My Credits Showing in Streaming Services?
If your credits are not showing in streaming services, it's possible that their platform is not yet built to display all of the detailed credits that DistroKid is capable of sending them. Additionally, please note that credits may take 1-2 weeks to appear in any services that accept them.
Some services show more credit information than others. Some can currently accept only a limited amount, but this may change in the future.
We'll monitor each service partner, and continuously update them with the maximum amount of metadata they can handle at any time. Most are starting with songwriters and producers.
There's information on how DistroKid supports credits in the DistroKid blog post here: https://news.distrokid.com/credits-34db783febf6.
Go to article -
What Are AI Credits?
AI Credits let you disclose when AI generated part of your track, like the lyrics, vocals, or instrumental performance. Streaming services (currently Spotify and Apple Music) show this info to listeners so they can see how a track was made.
What Counts as AI?
Add AI credits if part of the track was generated by AI:
- AI-generated audio (vocals, instrumental tracks, etc.)
- AI-generated lyrics (not written by a human)
- AI-generated compositions (melody or arrangement not composed by a human)
You don't need AI credits if you just used AI as a tool:
- Pitch correction, auto-tune, etc.
- AI-assisted mixing or mastering
- AI-assisted workflows
To learn how to add AI credits, go here.
Go to article -
How to Fill Out AI Credits
When you upload a track, we'll ask if any of it was generated by AI.
If yes, select at least one of these:
- The lyrics — AI wrote the words
- The music — AI composed the melody
- All of the audio — everything the listener hears is AI-generated
or
- Part of the audio — some of it is AI, some is human
If you pick "All of the audio," we'll also ask whether your artist name is a human or an AI persona. Streaming services need this to display your artist credit correctly on the track.
You can add or update AI credits after uploading, too. Go to your album page and click "Credits" next to each song, or visit https://distrokid.com/credits.
To learn more about AI credits, check out this article.
Go to article -
Adding Producer and Songwriter Credits or Liner Notes to Your Songs
To add additional credits and/or liner notes to your songs in DistroKid, first head to the credits dashboard. To do so, open the Features Menu in the upper right of DistroKid, click "Enhance your music," then click "Credits." You can also go directly to https://distrokid.com/credits.
From the credits dashboard, you can click on a song to add credits or liner notes to it. Submitted credits and liner notes will be delivered to all streaming services that currently accept them, but not all services will display every type of credit or note available through the credits dashboard. If you want to be sure your credit will be displayed in a service, we recommend listing it under a Songwriter or Producer credit.
When adding credits to a song for the first time, you must first credit a songwriter, as this is mandatory for all songs.
Adding Credits or Liner Notes to a Song
From the credits dashboard at https://distrokid.com/credits, you can click on a song to add credits or liner notes to it. Once you click a song, you'll be brought to a page where you can use the "Add new..." dropdown menu to select the type of credit or note.
Once you select the type of credit or note, a secondary dropdown menu will appear that will allow you to specify more details. For example, the "Musician" credit has a secondary menu that allows you to select the instrument for the musician.
After selecting the credit/note type and the details, you can enter the name of the person you are crediting or the information to display in the liner note. Once you enter the name or information, click "Save this credit." Once you have added all of the credits and liner notes you desire, click "Done, submit to streaming services" to send the updated credits and notes to services.
For a quick video on how to add Credits and Liner notes, check out our how-to below:
Go to article
-
Adding a Producer to a Release
You can add producer credits to your releases at any time by visiting your Credits page, even if your release is already live in services.
To do so, just head to the album page of the release you wish to edit from your DistroKid dashboard, then click on "Credits." You can also head to https://distrokid.com/credits and locate the release you're looking to add the producer credit to.
From the credits page, click the "Add New..." dropdown menu and select "Producer."
After you have selected the Producer credit type, you can choose a specific type of producer in the following drop down. After you have selected these fields, you can go ahead and enter your producer's name. You can also optionally add their email, though producer emails will not be shown on streaming services.
Once you enter the information, click "Save this credit." Once you have added all of the credits and liner notes you desire, click "Done, submit to streaming services" to send the updated credits and/or notes to services.
Go to article -
Why Does DistroKid Ask For Songwriters' Real Names?
DistroKid requires real songwriter names on the upload form to ensure streaming services properly credit and display songwriters for each track.
Songwriters are typically credited by their real names, rather than stage or band names.
Real names entered as songwriter credits won't be displayed prominently as an artist name, but will be displayed when a listener views the credits or lyrics of a song.
Artist Names vs. Songwriter Names
Artist names and songwriter names are handled differently in services. Artist names are displayed prominently, and songwriter names are typically only visible when viewing the credits or lyrics for a song.
For example, see the 2 Chainz song "Bigger Than You (feat. Drake & Quavo)" on Spotify (here). As you would expect, the artist names are listed as:
- 2 Chainz
- Drake
- Quavo
However, if you look at the credits for that song on Spotify (here's how), you'll notice those artists' real names are listed as songwriters. Their real names are, respectively:
- Tauheed Epps
- Aubrey Graham
- Quavious Marshall
Go to article
Cover Songs See all 6 articles
-
Why Am I Required to Purchase My Cover Song License Through DistroKid?
Go to article
A purchase of a cover song license in DistroKid is required because there is a law in the United States that dictates how earnings from cover songs need to be shared with the original songwriter. If you're interested in the details, click here.
DistroKid makes uploading cover songs easy. Each time you upload a song to DistroKid, you'll see an option to specify whether you wrote the song (an "original"), or if someone else wrote it (a "cover song").
To upload a cover song, choose "Another artist wrote it (it's a cover song)" on the upload form under "Songwriter / Cover Song." DistroKid will automatically deduct the legally-mandated fee of 12.7¢ per song sold in the U.S. from your earnings and send it to HFA, who sends it to the original songwriter. You'll get 100% of the rest.
Please note that DistroKid licenses apply only to content directly distributed by DistroKid, and cannot be used for any purposes outside of DistroKid. In addition, releases containing cover songs will not be available for sale in India, Pakistan, Mexico, or Canada, but will be available for streaming in those countries.
Uploading the Same Cover Song in More than One Release
You must purchase a DistroKid cover license each and every time you upload a cover song to DistroKid. For example, if you upload the same cover song twice, you need to select the "Cover Song" option both times, essentially buying two licenses. That's how our system knows to deduct the songwriter's share of earnings from your earnings (for both uploads of that song, in this example).
-
What is an Interpolation? Can I Use a Cover License to Upload One to DistroKid?
Interpolations are musical works which have re-recorded a musical element (usually a melody or portion of a melody) from a previously recorded song into a new composition. This differs from sampling, as an interpolation does not use any audio from the original recording.
DistroKid's cover licensing solution does not apply to interpolations. For more information on our cover licensing solution, please check out this article: https://support.distrokid.com/hc/en-us/articles/360013648953.
Go to article -
Do I Have to Purchase a Cover License Through DistroKid If I Already Have a License From Another Agency?
Yes, you must purchase a cover license through DistroKid each time you upload a cover song, even if you've purchased one through another licensing agency.
This is because DistroKid has no way of confirming that the original songwriter is getting paid their legally-required share unless we're the ones paying them.
Not opting cover songs into DistroKid's cover song licensing program can lead to streaming services taking down your content, or worse – songwriters taking legal action.
Go to article -
If I Upload a Cover Song as a Single, Can I Also Put That Cover Song On an Album?
You can absolutely upload a cover song as a single and then include that cover song on an album upload. However, please note that you'll need to purchase the cover song license again for the cover song that is being included in the album.
You must purchase a DistroKid cover license each and every time you upload a cover song to DistroKid.
If you upload the same cover song twice, you need to select the "Cover Song" option for both uploads, essentially buying two licenses. That's how our system knows to deduct the songwriter's share from your earnings in each instance of the cover song you upload.
Please also keep in mind that it is not possible to acquire a blanket cover license for an entire album or discography – if you're uploading a release with several cover songs, an individual cover license is required for each song.
For more information about purchasing cover licenses through DistroKid, please check out this article.
Go to article -
Uploading Music That Contains Sampling From Other Songs
DistroKid can help you distribute cover songs, but we cannot help approve the use of samples from other songs in your music.
Stores do not allow you to use another artist's stem or sample without their permission. However, it's okay to use royalty-free samples from sample library services such as Splice, Sounds, and LoopCloud. It is also fine to use royalty-free samples that are included as default sample libraries in your DAW.
If you use royalty-free samples, your music will be ineligible for the YouTube Content ID album extra.
Sampling vs. Cover Songs
Sampling is when you use an actual recording of another artist's performance in your music. An example would be using the 1971 recording of Led Zeppelin's "When The Levee Breaks" as your drum track. That's generally not legal, unless you have permission from the original artist or owner of the copyright.
A cover song is a song that you performed and recorded yourself, but the music was written by someone else. An example would be a recording of your band playing "Smooth Criminal" (written by Michael Jackson). This is totally okay to upload – DistroKid makes it easy to sell cover songs. To upload a cover song, select "Another artist wrote it" in the "Songwriter" section of the DistroKid upload form. You'll find cover song license pricing and more information on the upload form as well.
Go to article -
Can I Download My Cover License(s)?
Yes!
Just log in to your account and click on your Profile Icon in the top right. From there, click "Cover song licenses" to view your existing licenses.
Go to article